A rump roast costs roughly $5.99 to $8.99 per pound at most US grocery chains. Yet the average home cook still ends up with a tough, dry slab. The cut isn’t the problem. The method is.
Table of Contents
Quick Answer:
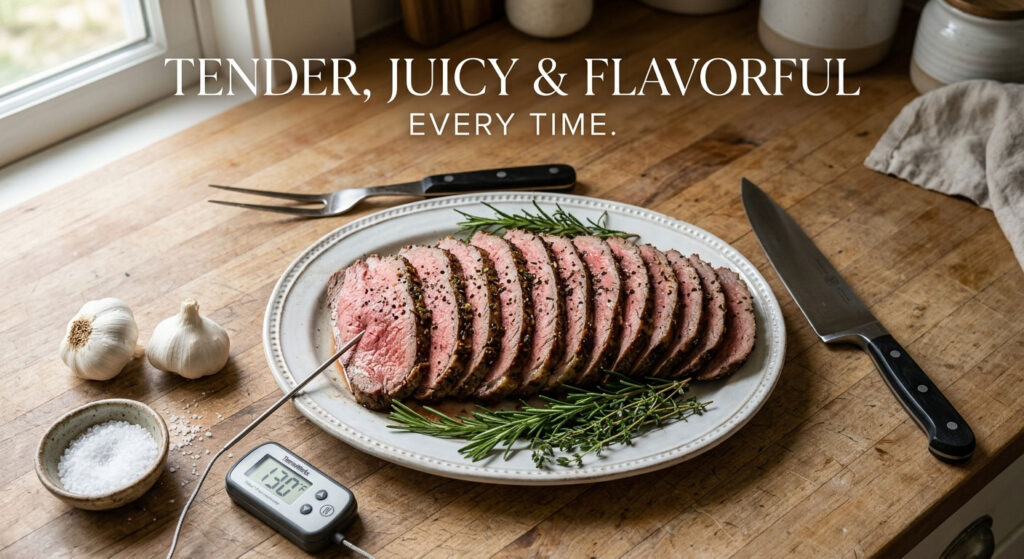
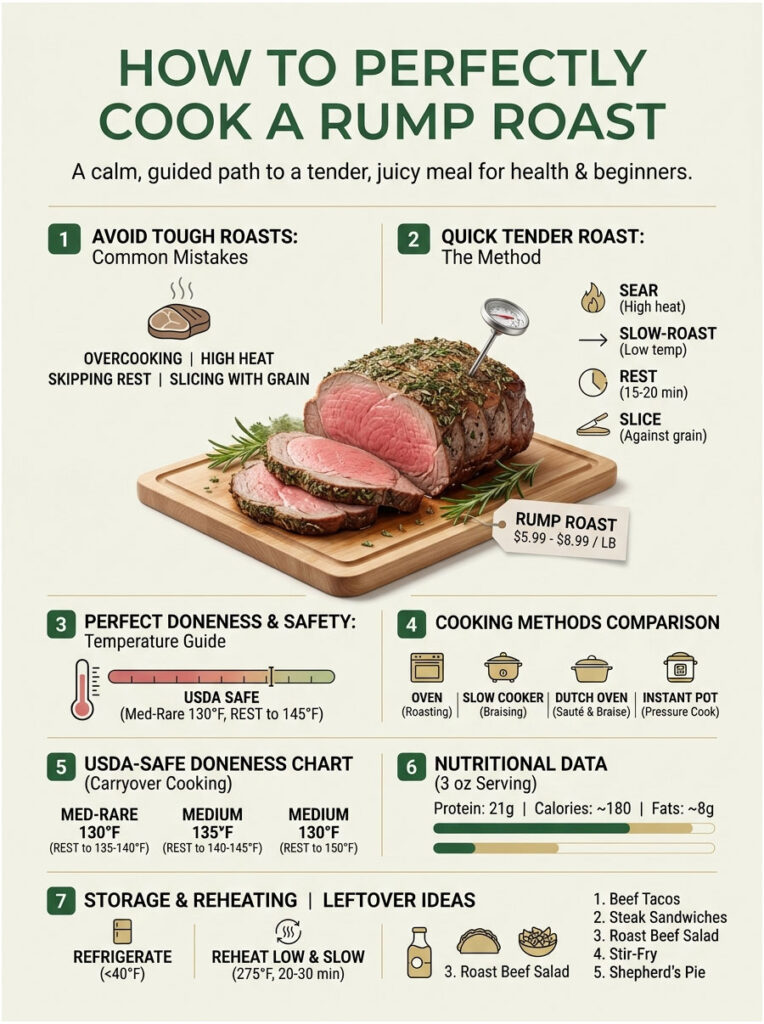
For a tender, juicy rump roast every time, sear a 3 to 4 lb roast in a hot skillet for 3 minutes per side, then slow-roast at 275°F until the internal temperature hits 130°F (about 90 minutes). Rest the meat tented in foil for 20 minutes so juices redistribute. Slice thin against the grain. The USDA-safe target for whole beef cuts is 145°F with a 3-minute rest, but pulling at 130°F gives medium-rare after carryover cooking.
At a Glance:
• 4-method comparison: oven, slow cooker, Dutch oven, Instant Pot
• USDA-safe doneness chart with carryover cooking math
• Real USDA nutrition data per 3 oz serving
• 5 reasons your last roast came out tough, plus the fix for each
• Heart-healthy low-sodium variation reviewed for AHA targets
• 12 FAQs covering every People Also Ask query
• Storage, reheating, and 5 leftover ideas to stretch one roast across the week
What Is a Rump Roast (And Why It’s the Smartest Cut on a Budget)
A rump roast comes from the hindquarters of a steer, specifically the round primal. It’s a working muscle, which means little marbling and a chewy texture if cooked wrong.
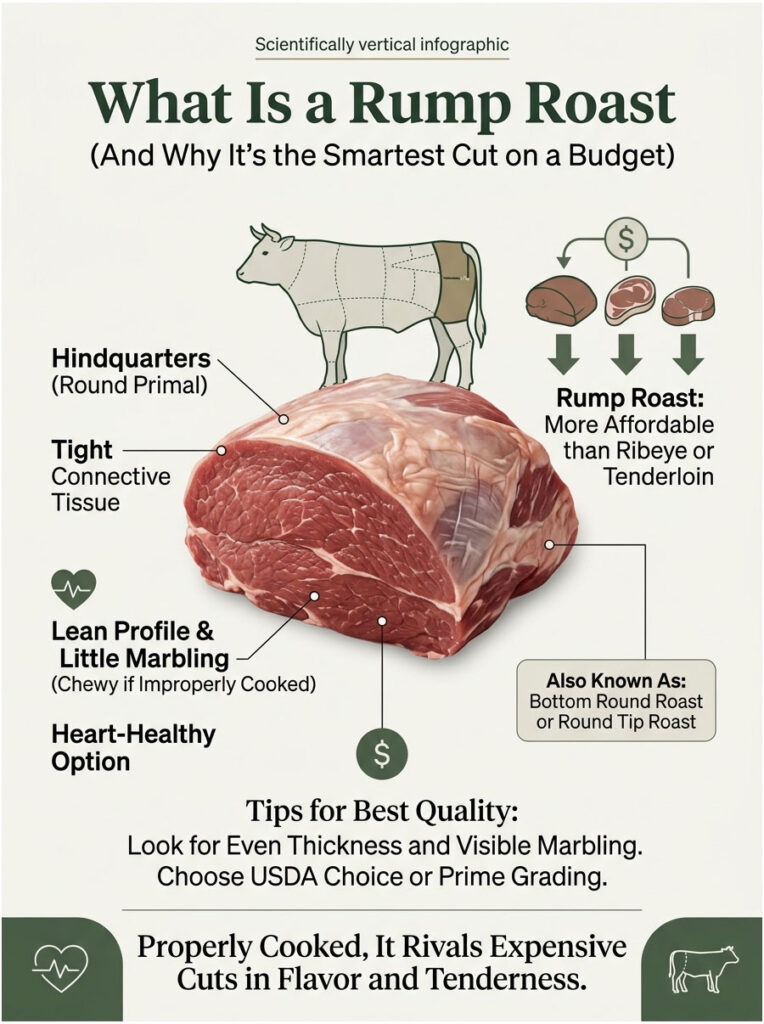
Cooked right, it rivals cuts costing twice as much. Most US butchers also label it “bottom round roast” or “round tip roast.” Same beef, different name.
Patients HealthCareOnTime serves often ask which red meats fit a heart-healthy plan. Rump roast lands surprisingly well thanks to its lean profile.
Where It Sits on the Cow
The round primal sits at the rear, above the back leg. Those muscles do daily work, so they develop tight connective tissue and minimal fat.
That’s why rump roast costs less than ribeye or tenderloin. Lean does not equal flavorless. Proper searing builds the deep brown crust that delivers most of a beef roast’s flavor.
Rump Roast vs Bottom Round vs Chuck Roast
Rump roast and bottom round are essentially the same cut, labeled differently by region. Chuck roast is a different animal in cooking terms.
Chuck comes from the shoulder and carries heavy marbling. It practically cooks itself into pot-roast tenderness. Rump roast doesn’t have that built-in fat insurance, so technique matters more.
How to Pick a Good One at the US Butcher Counter
Look for USDA Choice or USDA Prime grading on the label. USDA Select is leaner and tougher, harder to cook well at home.
Choose a roast with even thickness so it cooks uniformly. Visible white flecks of intramuscular fat (marbling) are a good sign. A roast that looks uniformly red with zero white speckling will turn out drier no matter what you do.
Rump Roast Nutrition (USDA Data Per 3 oz Cooked)
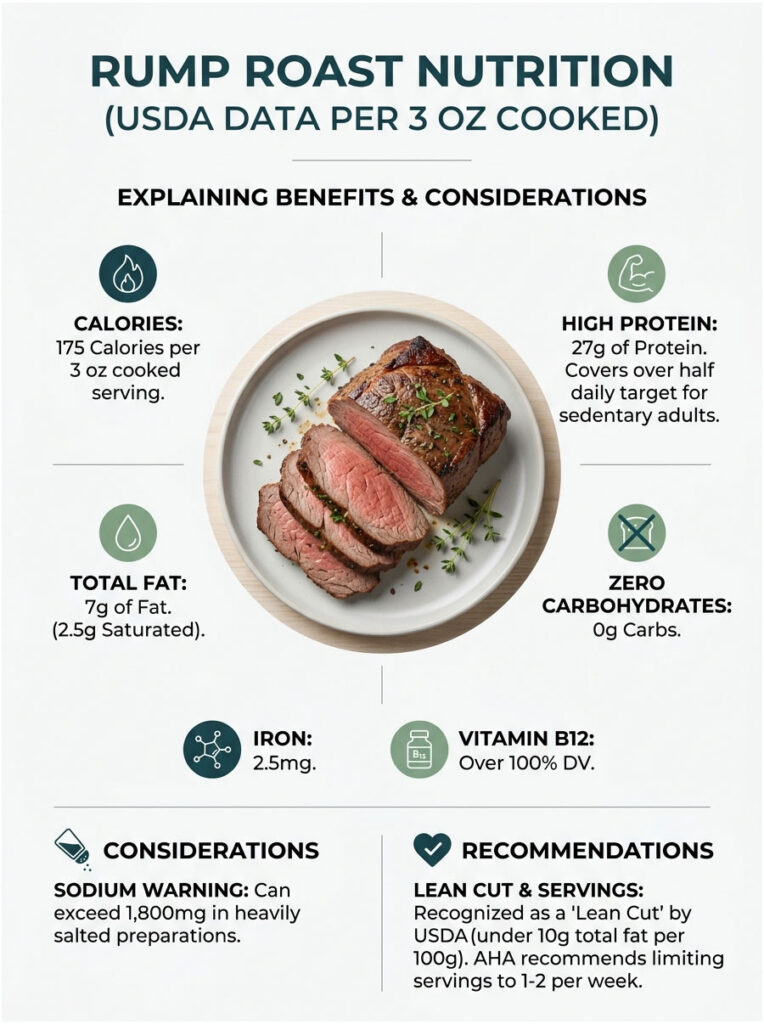
A 3 oz cooked serving delivers roughly 175 calories, 27 g of protein, 7 g of fat (2.5 g saturated), and zero carbs, per USDA FoodData Central. It also packs about 2.5 mg of iron and over 100% DV of vitamin B12.
That nutrient density makes rump roast a strong fit for active adults, weight-loss meal plans, and anyone managing low iron. The catch is sodium, which jumps fast depending on how much salt and broth go in.
The HealthCareOnTime nutrition team flags sodium as the single biggest pitfall in beef-roast meal plans, especially for clients new to managing blood pressure.
Protein, Iron, B12, and Zinc Breakdown
Rump roast supplies complete animal protein with all nine essential amino acids. Three ounces covers more than half of a sedentary adult’s daily protein target.
The B12 content alone (well over the daily value) supports red blood cell production and nerve function. Iron from beef is heme iron, absorbed more efficiently than the non-heme iron in plant foods.
Sodium and Saturated Fat Watchpoints
The American Heart Association caps daily sodium at 2,300 mg, with 1,500 mg as the ideal target for most adults. A heavily salted, broth-braised rump roast can blow past 1,800 mg per serving fast.
The fix is using low-sodium broth, salting deliberately, and skipping pre-mixed seasoning packets. Saturated fat sits at about 2.5 g per serving, moderate compared to ribeye or chuck.
How Rump Roast Fits Into AHA-Aligned Eating
The American Heart Association suggests keeping lean red meat to one or two servings per week as part of a balanced eating pattern. Rump roast fits that frame because it qualifies as “lean” by USDA labeling rules (under 10 g total fat per 100 g serving).
In cases reviewed by the HealthCareOnTime nutrition team, swapping fattier cuts like chuck or ribeye with rump roast once a week trims saturated fat intake without giving up family favorites.
Rump Roast Recipe (Tender, Juicy & Flavorful Every Time)
This is the master recipe. It works with a 3 to 4 lb roast and feeds 6 to 8 people. Adjust cook time by weight using the chart below.

Ingredients
- 3 to 4 lb rump roast (USDA Choice preferred)
- 1.5 tsp kosher salt (or 1 tsp table salt)
- 1 tsp freshly ground black pepper
- 4 garlic cloves, peeled and halved
- 2 tbsp olive oil or avocado oil
- 1 tbsp fresh rosemary, finely chopped (or 1 tsp dried)
- 1 tbsp fresh thyme leaves (or 1 tsp dried)
- 1 tsp smoked paprika
- 1 tbsp Dijon mustard
- 1 cup low-sodium beef broth
- 1 small yellow onion, sliced (optional, for pan juices)
Equipment
- Cast iron skillet or oven-safe Dutch oven
- Roasting pan or rimmed baking sheet
- Instant-read meat thermometer (a Thermapen-style probe is the gold standard)
- Aluminum foil
- Sharp carving knife
Step-by-Step Instructions
- Bring meat to room temperature. Pull the roast from the fridge 45 to 60 minutes before cooking. Cold meat hitting a hot oven cooks unevenly and turns chewy on the outside before the center reaches temperature.
- Pre-season generously. Pat the roast completely dry with paper towels. Cut small slits and tuck garlic halves inside. Coat the surface with olive oil and Dijon, then rub salt, pepper, paprika, rosemary, and thyme into every side.
- Sear to lock in flavor. Heat the cast iron skillet over medium-high until it smokes lightly. Sear each side for 3 minutes until a deep brown crust forms. Don’t move the meat. Let it crust up.
- Slow-roast at low temperature. Transfer the seared roast to a roasting pan. Pour the beef broth around (not over) it. Roast at 275°F until the internal temperature hits 130°F for medium-rare or 135°F for medium.
- Rest the meat (the critical step nobody talks about). Tent loosely with foil and rest for 20 full minutes. The temperature rises another 5°F to 8°F (carryover cooking), and juices redistribute back into the muscle fibers.
- Slice against the grain. Identify the direction the muscle fibers run, then cut perpendicular across them in thin slices (1/4 inch or less). Slicing with the grain makes even a perfectly cooked roast feel chewy.
The HealthCareOnTime wellness team’s standard guidance is to invest in a $30 instant-read thermometer before any other tool. It pays for itself the first roast it saves from overcooking.
How Long to Cook by Weight
A 2 lb roast typically needs 60 to 75 minutes at 275°F, a 3 lb roast needs 75 to 90 minutes, and a 4 lb roast needs 90 to 110 minutes. Always pull based on internal temp, not time.
Ovens vary, and the 130°F target matters more than minutes on the clock. A digital probe thermometer left in the meat eliminates guesswork entirely.
Table 1: 4 Cooking Methods Side-by-Side
| Method | Total Time | Best For | Tenderness | Skill Level |
| Oven Roast (275°F) | 2 to 3 hours | Sunday family dinner, holiday meals | Medium-rare, sliceable | Beginner |
| Slow Cooker (Crock-Pot) | 8 hours on low | Working parents, set-and-forget | Fall-apart, shreddable | Beginner |
| Dutch Oven Braise (325°F) | 3 to 4 hours | Comfort food, pot roast style | Fork-tender, juicy | Intermediate |
| Instant Pot (high pressure) | 90 min total | Last-minute weeknight | Tender, slightly drier | Beginner |
| Sous Vide (131°F bath) | 12 to 24 hours | Restaurant-quality precision | Edge-to-edge medium-rare | Advanced |
| Reverse Sear (oven + skillet) | 2.5 hours | Even pinkness, perfect crust | Medium-rare, crusty | Intermediate |
Each method works. Pick the one that matches your day, your equipment, and your patience.
USDA Safe Internal Temperatures + Doneness Chart
The USDA Food Safety and Inspection Service sets 145°F as the minimum internal temperature for whole beef cuts, followed by a 3-minute rest. Below that range, certain pathogens may survive.
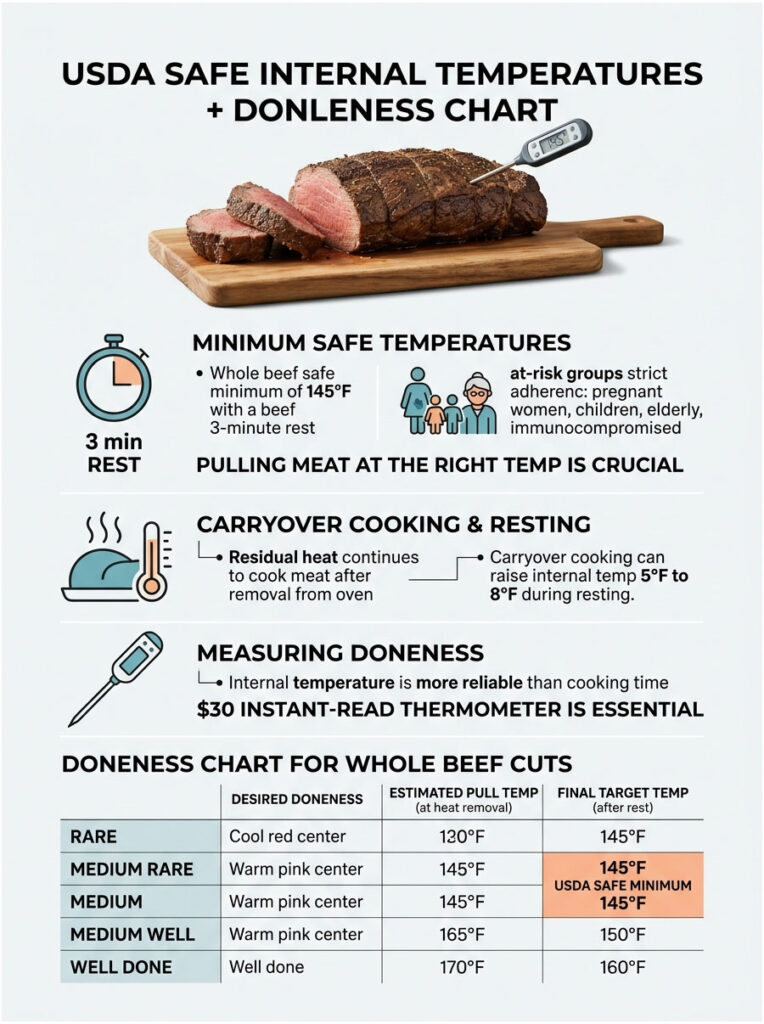
Most cooks pull below 145°F because carryover cooking adds another 5°F to 8°F during the rest. Knowing the math separates juicy medium-rare from an overcooked disaster.
Why a Thermometer Beats a Timer
Cooking time is a guess. Internal temperature is a fact. A 3 lb roast in a hot oven might hit 130°F in 75 minutes. The identical roast in a slightly cooler oven might need 105 minutes.
Our medical reviewers note that food-safety errors at home almost always trace back to skipping the thermometer step, especially with thicker cuts. A $30 instant-read probe pays back its cost the first time it saves a roast.
Carryover Cooking Explained
Once meat leaves the oven, residual heat keeps cooking the interior. A roast pulled at 130°F lands at 135°F to 138°F by the end of its 20-minute rest.
Pull too late and you overshoot into well-done territory. Pull too early and the center stays cold-rare. The pull-vs-final temperature gap is what makes beef chefs look like wizards.
Table 2: Doneness Chart + USDA Targets
| Doneness | Pull Temp (°F) | Final Temp After Rest (°F) | USDA-Safe? | Source |
| Rare | 120 | 125-128 | Below USDA min | USDA FSIS |
| Medium-Rare | 130 | 135-138 | Below USDA min, common in restaurants | USDA FSIS |
| Medium | 138 | 143-148 | At or above USDA min | USDA FSIS |
| Medium-Well | 145 | 150-155 | USDA-safe with rest | USDA FSIS |
| Well-Done | 155 | 160+ | USDA-safe | USDA FSIS |
| USDA Minimum | 142 | 145 (after 3-min rest) | Official safe target | USDA FSIS |
Pregnant women, young children, older adults, and anyone immunocompromised should follow the 145°F minimum strictly.
Why Your Rump Roast Came Out Tough (5 Common Mistakes Fixed)
Almost every dry, chewy rump roast traces back to the same five errors. Each has a clear, fixable cause.
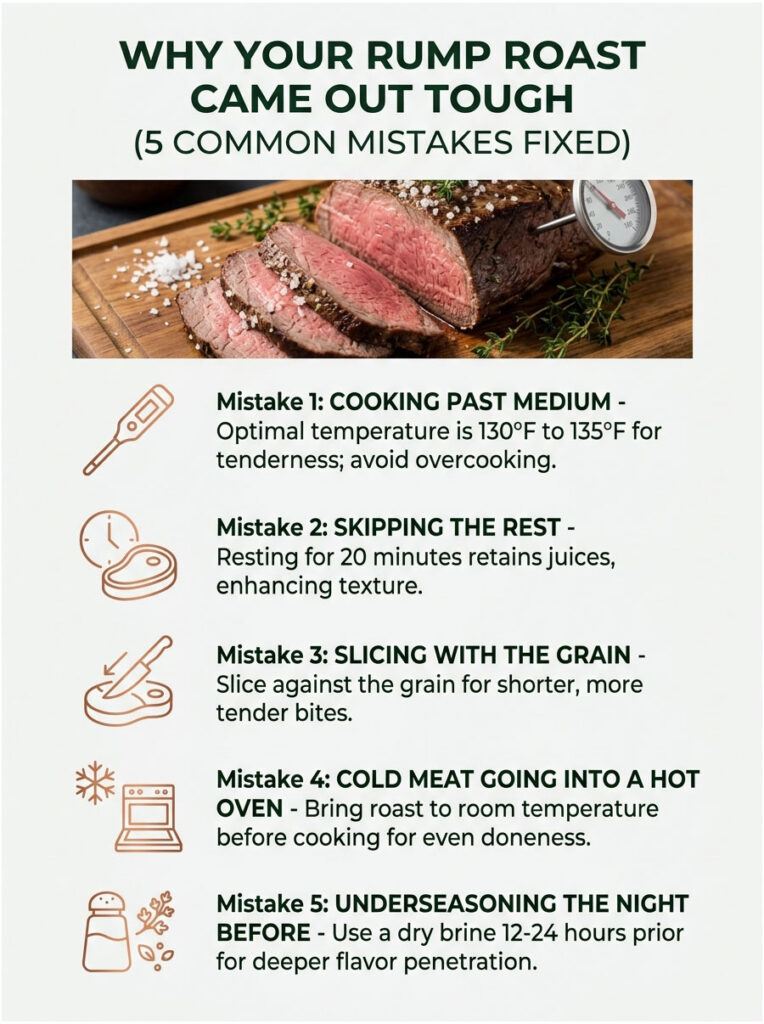
Mistake 1: Cooking Past Medium
Rump roast goes from juicy to leather between 140°F and 150°F. There’s almost no margin. Pulling at 130°F to 135°F preserves the texture.
If you prefer well-done meat, switch methods entirely. Slow-cook or braise instead of roast. The lean cut just won’t survive an oven past medium.
Mistake 2: Skipping the Rest
A roast straight from the oven loses up to 30% of its juices when sliced. That moisture pools on the cutting board instead of staying in the meat. Twenty minutes under foil fixes it.
Resting also lets the muscle fibers relax and reabsorb internal liquid. The meat literally re-tenderizes itself during those 20 minutes.
Mistake 3: Slicing With the Grain
Muscle fibers run in one direction along the cut. Slicing parallel to those fibers leaves long, ropy strands that need real chewing.
Slicing perpendicular (against the grain) shortens those fibers in each bite. The same roast suddenly feels twice as tender. Look for the lines on the surface, then cut across them.
Mistake 4: Cold Meat Going Into a Hot Oven
A roast pulled straight from the fridge has a 38°F center. To bring that to 130°F, the outer inch overcooks while the inside catches up. The result is a gray ring around a still-cold core.
Forty-five minutes on the counter brings the roast closer to room temperature. The cook becomes uniform from edge to edge.
Mistake 5: Underseasoning the Night Before
Salt needs time to penetrate. Salting just before roasting only seasons the surface. A dry brine (salting the day before, uncovered in the fridge) draws moisture out and back in carrying the salt deep into the muscle.
The HealthCareOnTime nutrition team’s working tip is 1 tsp kosher salt per pound, applied 12 to 24 hours ahead. It transforms texture without raising sodium beyond AHA daily targets when portions stay reasonable.
4 Rump Roast Variations for Every Kitchen
The master recipe is the foundation. These four variations adapt it to different equipment, schedules, and dietary needs.
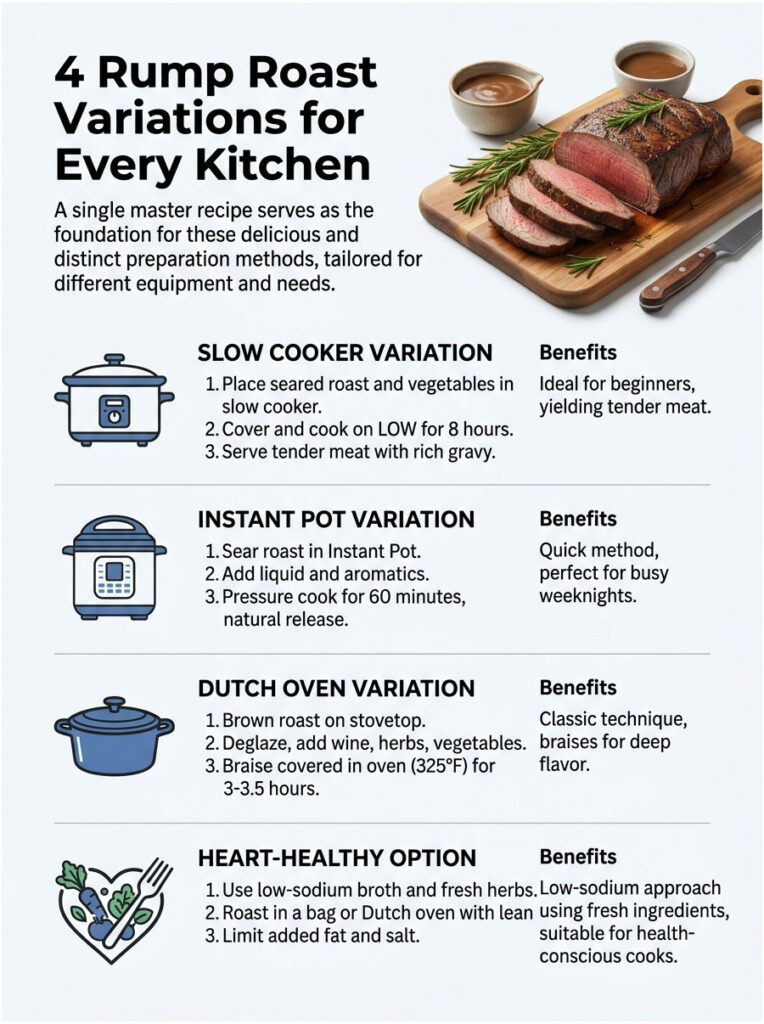
Slow Cooker (Crock-Pot) Rump Roast
Sear the seasoned roast in a skillet for 3 minutes per side. Transfer to a 6 quart Crock-Pot. Add 1 cup low-sodium beef broth, 1 sliced onion, 4 carrots, and 1.5 lb baby potatoes.
Cook on low for 8 hours or high for 4. The result is fall-apart tender, perfect for shredding. This method forgives newer cooks because the long, low cook breaks down connective tissue without the temperature precision the oven demands.
Instant Pot Rump Roast (90 Minutes Total)
Use the saute function to sear the roast for 3 minutes per side directly in the pot. Add 1 cup broth, garlic, herbs, and a splash of Worcestershire sauce.
Pressure-cook on high for 60 minutes. Natural release for 15 minutes, then quick release. This is the fastest path to tender shreddable beef on a busy weeknight.
Dutch Oven Braised Rump Roast
Brown the roast in a heavy enamel Dutch oven, then add 1.5 cups broth, 1/2 cup red wine, garlic, and a sprig of rosemary. Cover with the lid and braise at 325°F for 3 to 3.5 hours.
This produces classic American pot-roast texture with deep, layered flavor. The lid traps moisture, so the lean meat never dries out. Lodge cast iron and Le Creuset enamel both work well.
Heart-Healthy Low-Sodium Rump Roast
Skip pre-mixed seasoning packets, which often pack 800+ mg of sodium per serving. Use only 3/4 tsp kosher salt total, plus garlic, herbs, smoked paprika, black pepper, and a squeeze of lemon to brighten the flavor.
Use unsalted or homemade beef stock as the braising liquid. Patients booking lipid panels with HealthCareOnTime often ask for swaps like this, especially when newly managing high blood pressure or borderline cholesterol.
What to Serve With Rump Roast (Heart-Smart Pairings)
Sides shape whether your rump roast dinner reads as indulgent comfort food or a balanced plate that lands inside USDA dietary guidelines.
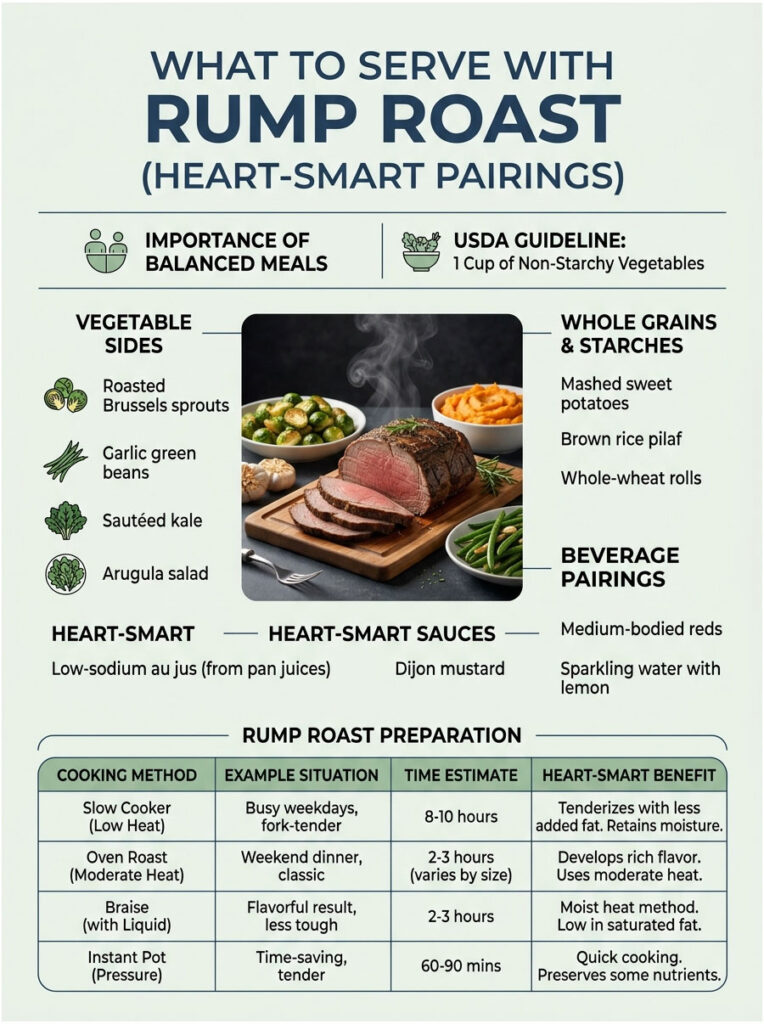
Vegetable Sides
Roasted Brussels sprouts, garlic green beans, sauteed kale with olive oil, or a simple arugula salad with lemon vinaigrette all work. Aim for at least one cup of non-starchy vegetables on the plate to align with the USDA Dietary Guidelines target.
Steamed broccoli with a squeeze of lemon adds vitamin C, which helps your body absorb the iron from the beef.
Whole Grains and Starches
Mashed sweet potatoes, roasted baby potatoes, brown rice pilaf, or whole-wheat dinner rolls keep the meal grounded. Sweet potatoes add fiber and beta-carotene that pair nicely with the lean protein.
For lower-carb plates, swap mashed potatoes for mashed cauliflower or a serving of farro.
Sauces and Au Jus Made With Low-Sodium Broth
Strain the pan juices through a fine mesh, skim the fat, and reduce by half. Add 1 tsp Dijon mustard and a splash of red wine.
The result is a restaurant-style au jus that adds maybe 100 mg of sodium per serving instead of the 600+ mg in jarred sauces. For a thicker gravy, whisk in 1 tbsp cornstarch slurry and simmer for 2 minutes.
Wine and Beverage Pairings
A medium-bodied red like a California Zinfandel, an Oregon Pinot Noir, or a Washington Cabernet pairs well with rump roast. Sparkling water with lemon is the alcohol-free move that won’t compete with the beef’s flavor.
The American Heart Association recommends limiting alcohol to two drinks per day for men and one for women.
Table 3: If You Have X, Cook Y Way
| Your Situation | Recommended Method | Total Time | Why It Works |
| Last-minute weeknight dinner | Instant Pot | 90 minutes | Pressure cooking shortcuts the long braise; no babysitting |
| Sunday family meal | Oven roast at 275°F | 3 hours | Forgiving, sliceable, leftovers for the week |
| Working parent (set & forget) | Slow Cooker on low | 8 hours | Start before work, dinner ready at 6 PM |
| Holiday entertaining | Reverse sear (oven + skillet) | 2.5 hours | Edge-to-edge medium-rare with restaurant-quality crust |
| Heart-healthy diet | Dutch oven braise, low-sodium | 3.5 hours | Controls sodium, herbs deliver flavor without salt |
| Meal prep for the week | Slow cooker (shreddable) | 8 hours | Yields tacos, sandwiches, salads across 4 to 5 meals |
How to Store, Reheat, and Repurpose Leftovers
A 3 lb rump roast typically yields enough leftovers for 2 to 3 additional meals. Storing and reheating it correctly is what keeps the second-day version as good as the first.
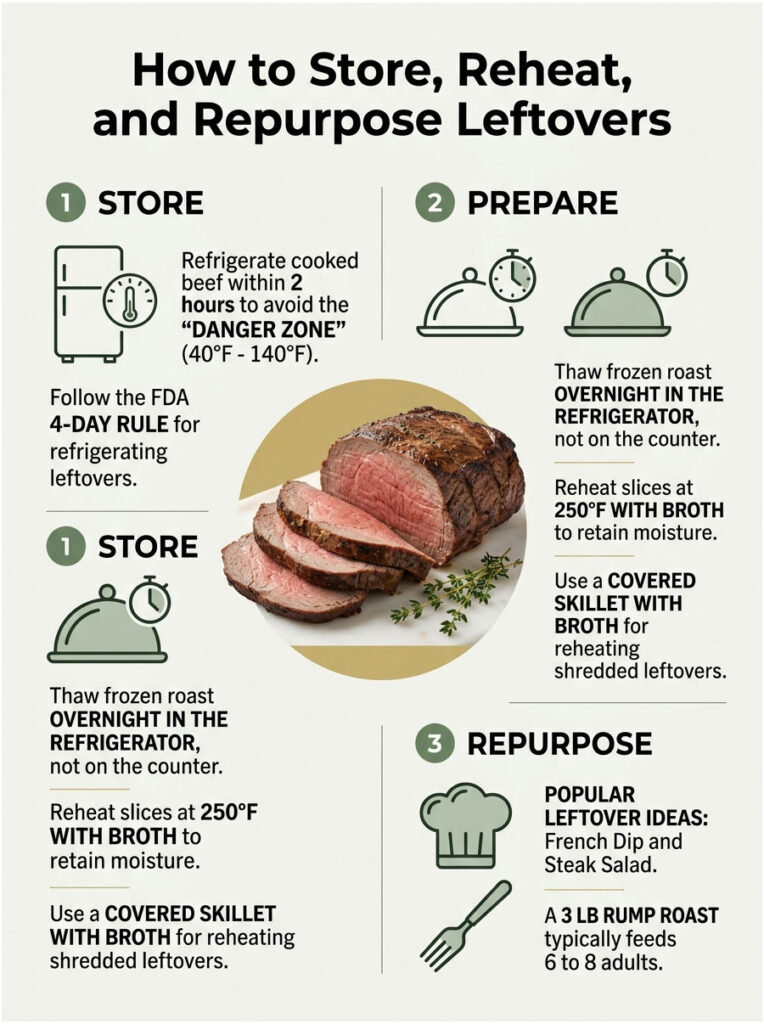
Refrigeration Timing (FDA 4-Day Rule)
The FDA cold-storage chart sets the safe refrigerator window for cooked beef at 3 to 4 days. Slice or shred the roast, transfer to airtight containers, and pour any pan juices over the top to keep it moist.
Refrigerate within 2 hours of cooking. The “danger zone” between 40°F and 140°F is where bacteria multiply fastest.
Freezing for Up to 3 Months
For longer storage, slice the roast into portion-sized packages and freeze in vacuum-sealed bags or heavy-duty freezer bags. Press out as much air as possible to prevent freezer burn.
Thaw overnight in the refrigerator, never on the counter. Use within 24 hours of thawing for best flavor and texture.
Reheating Without Drying Out
The trick is low and slow, the same as the original cook. Wrap slices in foil with a tablespoon of broth and reheat at 250°F for 15 to 20 minutes. Microwaving on high cooks the moisture out fast.
For shredded leftovers, reheat in a covered skillet with a splash of broth over low heat.
5 Leftover Ideas
- French dip sandwiches: Pile sliced roast on toasted hoagie rolls with melted Swiss cheese; serve with warm au jus for dipping
- Beef tacos: Shred the meat, warm with a pinch of cumin and lime juice, serve in corn tortillas with avocado and cilantro
- Beef and barley soup: Simmer leftover roast and pan juices with barley, carrots, celery, and a low-sodium broth base
- Steak salad: Slice cold leftover roast over mixed greens, blue cheese crumbles, walnuts, and balsamic vinaigrette
- Loaded baked potatoes: Top russet potatoes with shredded roast, Greek yogurt, sharp cheddar, chives, and salsa for a balanced one-bowl meal
Across kitchens reported by HealthCareOnTime newsletter readers, the French dip and steak salad get repeated most often. Both stretch portions, and both pack vegetables alongside the protein.
Frequently Asked Questions
What is the secret to a tender rump roast?
The single biggest factor is internal temperature. Pull a rump roast at 130°F for medium-rare, then rest it for 20 minutes under foil. Slice thin against the grain. Skip any of those three steps and the lean meat turns chewy. A digital thermometer is non-negotiable for consistent results.
Should I cover rump roast with foil when roasting?
No, not during the active oven roast. Covering traps steam and prevents the brown crust from forming. After the roast comes out of the oven, tent loosely with foil during the 20-minute rest. That preserves heat without steaming the crust away.
How long do I cook a 3 lb rump roast at 350°F?
A 3 lb rump roast at 350°F takes roughly 60 to 75 minutes to reach 130°F internal. Lower heat (275°F) takes 90 minutes but gives more even cooking and better texture for lean cuts. Always rely on a thermometer over time-based estimates because oven calibration varies widely.
Can rump roast be cooked medium-rare safely?
Yes, when the whole muscle is intact (not ground or chopped). The USDA minimum for whole beef cuts is 145°F with a 3-minute rest, but pulling at 130°F is common in US restaurants for medium-rare. Pregnant women, immunocompromised people, and young children should stick to the USDA 145°F target.
Is rump roast the same as bottom round?
Effectively yes. Both come from the round primal at the rear of the cow. “Rump roast” and “bottom round roast” are often used interchangeably at US grocery counters. Some butchers also use “round tip roast.” Treat them all the same way: low and slow cooking with a hard sear up front.
What’s the difference between rump roast and chuck roast?
Chuck roast comes from the shoulder and has heavy marbling. It practically cooks itself into pot-roast tenderness. Rump roast comes from the rear and is much leaner, which means it cooks faster but dries out faster too. Use chuck for fall-apart pot roast, rump for sliced roast beef dinners.
Is rump roast healthy and good for weight loss?
Rump roast qualifies as lean by USDA standards (under 10 g total fat per 100 g serving). A 3 oz portion delivers 27 g of protein for about 175 calories, which supports satiety and muscle maintenance during a calorie deficit. Watch sodium from broths and rubs, since heavily salted preparations can blow past AHA targets.
How long should rump roast rest after cooking?
Rest a rump roast for 15 to 20 minutes after pulling it from the oven. Tent loosely with foil to keep heat in without steaming the crust. The rest lets juices redistribute and adds 5°F to 8°F of carryover cooking, hitting your final target without overshooting it.
Can I cook a frozen rump roast?
Yes, but only in the Instant Pot or as a slow braise. Add 50% more cooking time. Never roast a frozen rump roast in the oven, since the outside burns before the inside reaches a safe temperature. Thawing overnight in the refrigerator gives the most reliable result.
Why is my rump roast tough even after slow cooking?
Two likely causes. Either the roast did not cook long enough for connective tissue to break down (slow cooker rump roast needs at least 7 hours on low), or the slicing direction was wrong. Lean cuts shredded with the grain still feel chewy. Always slice or pull perpendicular to the muscle fibers.
What’s the best seasoning for rump roast?
A simple rub of kosher salt, black pepper, garlic, smoked paprika, rosemary, and thyme delivers classic flavor without sodium overload. Skip pre-mixed seasoning packets, which often hit 800 mg sodium per serving. A teaspoon of Dijon mustard rubbed on before the dry seasonings helps everything stick.
How many people does a 3 lb rump roast feed?
A 3 lb rump roast typically feeds 6 to 8 adults as the main protein, allowing roughly 6 oz raw weight per person. After cooking and trimming, expect 4 oz cooked per serving. Add hearty sides like potatoes and roasted vegetables to stretch portions further for larger gatherings.
Disclaimer:
The information in this guide is for educational purposes only and is not medical or dietary advice. Always consult your physician, registered dietitian, or qualified healthcare provider before making major changes to protein intake, sodium consumption, or any eating pattern, especially if you manage high blood pressure, diabetes, kidney disease, or follow a physician-prescribed diet. HealthCareOnTime makes no claims to diagnose, treat, cure, or prevent any disease.
References
- USDA FSIS: Safe Minimum Internal Temperature Chart
- USDA FoodData Central: Beef Round Nutrient Database
- USDA Dietary Guidelines for Americans 2020-2025
- FDA: Are You Storing Food Safely?
- American Heart Association: How Much Sodium Should I Eat Per Day?
- American Heart Association: Alcohol and Heart Health
- Mayo Clinic: Heart-Healthy Diet Guidance
- Cleveland Clinic: Lean Meat Selection Guide
- Beef Checkoff: Rump Roast Cut Information
- Harvard T.H. Chan School of Public Health: Protein